2017-04-06
 来源:网络
来源:网络
 作者:网络
作者:网络
《绝地求生大逃杀》是一款相当出色的游戏,但配置优化问题却让玩家烦恼不已,尤其对于低配玩家来说更是噩梦。低配电脑怎么流畅玩游戏?今天小编就带来了玩家“年〃”分享的低配优化图文教程,感兴趣的玩家可以来看看!
教程:
步骤1.
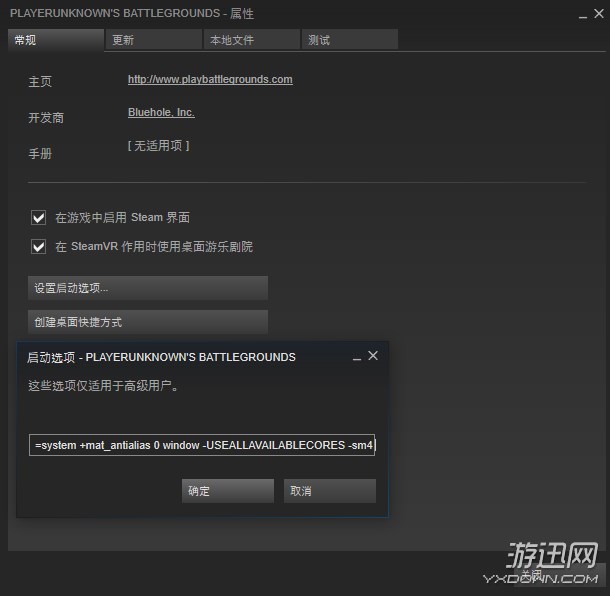
Steam PropertiesGo in to your Steam Library -> Playerunknow's nBattleground -> right click -> Properties -> Steam launch noption(到你的steam游戏库,选择绝地求生游戏,右键属性,高级选项,复制粘贴以下内容。)
COPY AND PASTE
-malloc=system +mat_antialias 0 window -USEALLAVAILABLECORES -sm4
步骤2.
Configure PUB SettingsFirst! after COPY AND PASTE [ MAKE SHURE YOU MAKE ALL n.ini's READ ONLY ](首先设置你的ini文件取消勾选只读)
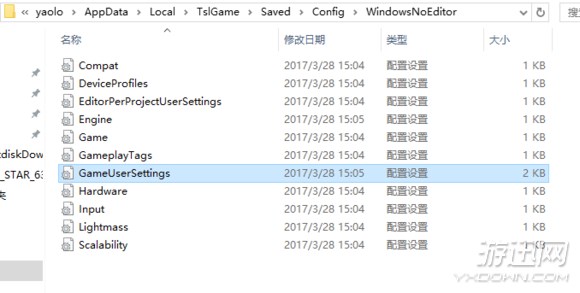
Go to %APPDATA% using the File nExplorer(然后到你的C盘用户,APPDATA文件夹下依次打开到WindowsNoEditor.ini文件。win10为例下面给图)
Go to [Local] – [TSLGame] – [Saved] – [Config] – [WindowsNoEditor]
Open GameUserSettings.ini(打开此文件,复制粘贴以下内容*****强烈建议备份防止游戏出现错误****)
[ScalabilityGrouPS]
sg.ResolutionQuality=70
sg.ViewDistanceQuality=0
sg.AntiAliasingQuality=0
sg.ShadowQuality=0
sg.PostProcessQuality=0
sg.TextureQuality=0
sg.EfFectsQuality=0
sg.FoliageQuality=0
sg.TrueSkyQuality=0
sg.GroundClutterQuality=0
sg.IBLQuality=0
sg.HeightFieldShadowQuality=0
Save and make Read only
Open Engine.ini
[Core.System]
Paths=../../../Engine/Content
Paths=%GAMEDIR%Content
Paths=../../../Engine/Plugins/OceanPlugin/Content
Paths=../../../Engine/Plugins/Mutable/Content
Paths=../../../Engine/Plugins/Runtime/Coherent/CoherentUIGTPlugin/Content
Paths=../../../Engine/Plugins/RoadEditor/Content
Paths=../../../Engine/Plugins/2D/Paper2D/Content
Paths=../../../Engine/Plugins/Wwise/Content
[/script/engine.engine]
bSmoothFrameRate=true
MinDesiredFrameRate=60
SmoothedFrameRateRange=(LowerBound=(Type="ERangeBoundTypes::Inclusive",Value=60),UpperBound=(Type="ERangeBoundTypes::Exclusive",Value=144))
MaxPixelShaderAdditiveComplexityCount=128
MaxES2PixelShaderAdditiveComplexityCount=45
TimeBetweenPurgingPendingKillObjects=30
bDisablePhysXHardwareSupport=True
[/script/engine.renderersettings]
r.SeparateTranslucency=False
r.CustomDepth=1
r.DefaultFeature.Bloom=False
r.DefaultFeature.AmbientOcclusion=False
r.DefaultFeature.AmbientOcclusionStaticFraction=False
r.DefaultFeature.MotionBlur=False
r.DefaultFeature.LensFlare=False
r.DefaultFeature.AntiAliasing=0
r.ViewDistanceScale=1
r.ShadowQuality=0
r.Shadow.CSM.MaxCascades=1
r.Shadow.MaxResolution=256
r.Shadow.RadiusThreshold=0.1
r.Shadow.DistanceScale=0.1
r.Shadow.CSM.TransitionScale=0
r.DistanceFieldShadowing=0
r.DistanceFieldAO=0
r.DepthOfFieldQuality=0
r.RenderTargetPoolMin=300
r.LensFlareQuality=0
r.SceneColorFringeQuality=0
r.EyeAdaptationQuality=0
r.FastBlurThreshold=0
r.Upscale.Quality=1
r.TonemapperQuality=0
r.RefractionQuality=0
r.SSR.Quality=0
r.SceneColorFormat=3
r.TranslucencyVolumeBlur=0
r.MaterialQualityLevel=0
r.SSS.Scale=0
r.SSS.SampleSet=0
r.EmitterSpawnRateScale=0.75
Save and make Read only
Open Scalability.ini
You must have all very low in GAME SETTINGS then it works
[ScalabilitySettings]
PerfInDexValues_ResolutionQuality="50 50 50 50"
[AntiAliasingQuality@0]
r.MSAA.CompositingSampleCount=1
[ViewDistanceQuality@0]
r.SkeletalMeshLODBias=5
[ShadowQuality@0]
r.LightFunctionQuality=0
r.ShadowQuality=0
r.Shadow.CSM.MaxCascades=0
r.Shadow.MaxResolution=32
r.Shadow.RadiusThreshold=0.24
r.Shadow.DistanceScale=0.1
[PostProcessQuality@0]
r.DepthOfFieldQuality=0
r.RenderTargetPoolMin=200
r.Upscale.Quality=0
[TextureQuality@0]
r.MaxAnisotropy=0
[EffectsQuality@0]
r.TranslucencyLightingVolumeDim=1
r.RefractionQuality=0
r.SceneColorFormat=3
[FoliageQuality@0]
r.ParticleLightQuality=0
Save and make Read only(保存并设置只读)
步骤3. FOV Change(视野设置。)
When attempting to complete Step 3, one needs to make Engine.ini writeable nagain. So untick Read-Only and apply then make it nreadonly.(好像是完成步骤3以后不需要改写ini文件了,所以取消勾选只读的文件恢复勾选只读)
Open Engine.ini(打开此文件)
add this(在最下面复制粘贴)
[/script/engine.localplayer]
AspectRatioAxisConstraint=AspectRatio_MaintainYFOV
Note: YOU CANT CHANGE THE FOV LIKE 80, 90, 100(你不能改变FOV视野,像是80 90 100 n这么调,好像是这意思,不对希望给补充下)
步骤4. Park Control
Check whether all CPUs are enabled(检查是否启用所有cpus?)
type (bitsum点com/parkcontrol/) and download the latest nVersion(去这网站下载版本,要9.9欧元,看了下这个软件好像就是内核停车软件,大致就是关闭多余内核)
install it and you must see all on 100% and Parking AC/DC and Freq Scaling nAC/DC must be on disable - then click accept(恩安装完后看CPU nAC与DC模式是否达到100%...ac好像是高性能模式dc好像是内存双通道?)
这个步骤大概就是加强利用cpu与双通吧? 至于DC模式大家可以看下cpuz会显示非一组与一组,具体可以百度吧不多说了,第四部我没有弄,自己4690k n4条内存。
步骤5. Switch Default
Coresopen (打开下面这些)
msconfig(系统配置) -> Boot(引导) -> Advance Options(高级选项) -> numbers of nprocessors ( max ) -> hit okay 通过系统配置把核心数量调到最高
以上就是具体教程介绍,希望能对各位玩家有所帮助!